
📋 Prerequisites
- 👪 Remove any additional accounts before you begin!
- Select Settings in the top right corner, then select Accounts
- Select Remove next to the account you wish to remove, then select Remove again to confirm.
- 🔑 Make sure to turn off your Quest password, you can add it back once you're done
- 🗑️ If you previously owned Echo VR, install it from your library then uninstall it!
- 👓 Quest 2 or Quest 3 headset (Pro + Quest 1 not tested)
- 🕵 Developer mode enabled
How to enable Developer mode
- Go to this page and create a company, the name doesn't matter!
- In the Quest app, go to Settings > Your Headset > Developer Mode
- Toggle Developer Mode on
- 💫 Join Echo VR Lounge Discord
This server manages your account. Don't leave it after joining!
- 💻 You don't need a computer for this installation!
How to remove additional accounts
-
Removing an account from a device will also remove that account's data from the device.
But - if you do have a computer, I highly recommend using Marcel's installer, as it's much quicker and less complicated. You can find how to use it here!
⬇️ Downloads
Applications
Echo VR obb
- ..readyatdawn.r15.obb - the obb file for Echo
If you did previously own Echo
- Echo_patched.apk - the apk file for Echo
If you didn't previously own Echo
- Your own personalised APK
- Log in to Discord on your Quest
- Join this additional Discord server, react to the Quest message, and download it from the DM you receive

If you get a 404 error, remove your reaction on the server, then react again!

📼 Video Tutorial
Under construction, use the text for now!!
Do not use this if you didn't previously own Echo!
This is going to be updated soon, follow the text if you haven't owned it previously instead!
- Here's the EchoQuest.zip if you want to follow it anyway!
📥 Installing APKs
You can skip this if you already have an installation method and just install the APKS :3
Or follow this guide (sorry about the quality I couldn't find any better ones)- Download Mobile VR Station from the Quest store and open it
- Click on “Configuration Wizard” > “Show All Options” > “Configure Scoped Storage”
- Click on “Step 1: Request Access” (ignore that the button below is faded out!)
- At the top, click on the base directory
- Click on “Downloads”
- Click on the enlarge icon zoom_out_map on all the APKS then Continue and Install - clicking open doesn’t do anything!
- Once they're all installed, click the X at the top right to close MVS
If it shows up,
(NEVER CLICK ON RESTORE!!!!)
Click on close instead!!

If the screen just dims, the buttons are still there! Try clicking about to find it yourself, and look at where I click in the video!
🔓 Enabling a second developer mode and using Shizuku to get root access
- Open Evolve Launcher
- Click on the bottom right button, then click on "Device Settings"
- Scroll down to About Phone, then spam “Build Number” at the bottom until you become a developer!
- Go to the previous menu and click on “System” then “Developer Options”.
- Scroll down and turn on USB Debugging if it’s off, then turn on Wireless Debugging below it and click on the text.
- Put this tab into split screen and open Shizuku
- Click “Pairing” in Shizuku, then enter the code on the second screen after clicking "Pair device with pairing code" in Evolve.
- Once they're paired, click Start!
- You’re now able to access root files! Try to keep Shizuku open (although don't worry if it's a pain, it's not the end of the world if they get minimised, just don't click the X and reopen it!) and move on to the next step :)
If you're sent to the previous screen / it doesn't work, turn off your Quest password and restart your headset then try again!
To use splitscreen, make sure you're not in an application and you're using the cursor rather than physically touching it!
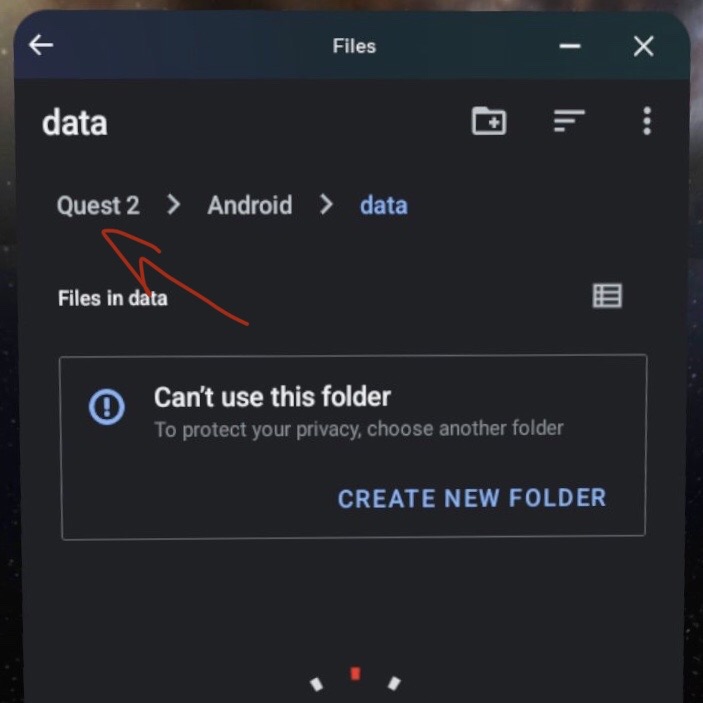
🚚 Move the OBB File
- Open ZArchiver while keeping Shizuku open and allow file access
- Click on settings at the top right, then ROOT, click on the first option and set it to “Shizuku”, then turn on all the toggles after that!
- Once it's done installing, hold down on the com.readyatdawn.r15.obb file and click copy
- Click on the top file named ".." and go back to your home directory, then navigate to “Android” > “obb” (Don't use the back button at the top, it will clear your selection)
- A prompt should pop up in Shizuku, click on Allow, then click on "obb" in ZArchiver again.
-
Create the folder "com.readyatdawn.r15", then go inside it and click on the paste button in the bottom right (even if it says access denied)
Make sure to name it exactly com.readyatdawn.r15 , otherwise it won't work!
- You should have successfully set up Echo VR!
🥳 Launch Echo VR
Launch Echo VR from Evolve Launcher
You may get a prompt that says Open, Restore or Cancel.
Click on "Open", never restore! If Open doesn't exist, click on Cancel and try opening it again.
(Basically, NEVER CLICK ON 'Restore'!!!!)
🔗 Linking your headset
Once you log in, you will see a "Login failed" screen with a code.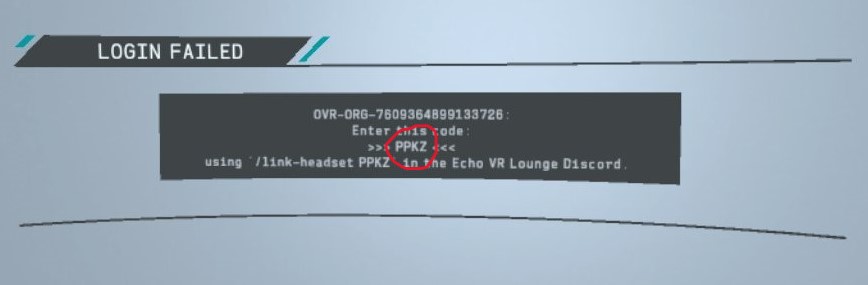
- Go to #command-central in the Echo VR Lounge
- Type /link and click on the command that shows up (if you're on a Quest, click off and back on the textbox), then enter your code!
- Once it's successfully linked, restart Echo and hit play!
![]()
You can watch Xero's much more in-depth video here :)
Welcome to Echo, have fun! Please be kind 😊
If it crashes for you, try force quitting it, by either holding down on Echo in Evolve Launcher, then clicking the info button, then “Force Quit” or restarting your quest. If it continues crashing, try moving the OBB file again, and if it still crashes, reinstall the APK and start from the beginning!